You’re wondering how 3D printing files work and what their specific features are? At Imprimy, we are here to explain everything to you.
What are the different types of 3D printing files?
There are many types of files, offering different advantages depending on the specifics of your models.
- What are the different types of 3D printing files?
- How to Prepare Your Files for 3D Printing?
- Common Mistakes to Avoid with 3D Printing Files
- What are the tools and software used to create and manipulate 3D printing files?
- What are the best practices for successful 3D printing?
- What is the future of 3D printing files?
- Conclusion: 3D Printing Files
- Our other contents about 3D printing technology:
Stereolithography (STL) Files
Stereolithography files, or STL files, are commonly used file formats in the field of 3D printing. They describe the geometry of a three-dimensional object by representing its surface as triangles, which allows 3D printers to understand and reproduce the exact shape of the object.
This format is particularly popular because it is compatible with the majority of 3D modeling software and 3D printers. However, although the STL file is very useful for creating prototypes and models, it does not contain information about color or material properties, limiting its use for more complex applications.
Wavefront Object (OBJ) Files
Wavefront Object files, or OBJ files, are another commonly used format in the field of 3D modeling and printing. Unlike STL files, which only contain geometric information about an object’s surface, OBJ files can include more detailed data, such as colors, textures, and materials associated with the object.
his format allows for better handling of complex models, including information about surfaces and visual details, making it particularly suitable for 3D rendering applications and for creating objects with specific textures or finishes. OBJ files are widely used in 3D modeling software and are compatible with many 3D printers.
Additive Manufacturing File (AMF) Files
The Additive Manufacturing File (AMF) format is a relatively recent one in the field of 3D printing, designed to overcome some limitations of STL files. Unlike STL files, which only contain geometric information, AMF files allow for the storage of richer data, such as material information, colors, textures, and even the internal structures of objects.
This format is also capable of handling more complex objects, such as those containing multiple materials or more detailed geometries. Therefore, AMF is particularly suited for applications where precision and material diversity are essential, and it is supported by a number of modern software and 3D printers.
The 3D Manufacturing Format (3MF) files
The 3D Manufacturing Format (3MF) files are another advanced format in the field of 3D printing, designed to address some of the limitations of older formats like STL. Unlike STL files, which only store surface data, 3MF files can include more detailed information, such as colors, materials, and textures, making them more suitable for complex and multi-material prints.
The 3MF format also supports additive manufacturing processes by allowing for the representation of objects with internal structures, metadata, and support for manufacturing instructions. This makes 3MF an ideal format for modern 3D printing applications, offering greater precision and flexibility compared to traditional file formats.
G-code files
G-code files are the most commonly used file format in 3D printing and CNC machining. These files contain a series of instructions that guide the 3D printer or machine on how to move, extrude material, and build up the object layer by layer. Essentially, G-code is a language that provides the printer with specific commands, such as the speed, temperature, and path to follow for each layer of the print.
In 3D printing, the G-code file is generated from a 3D model (often in STL or other formats) through a slicing software. The slicing software breaks down the 3D model into individual layers and then generates the corresponding G-code instructions for each layer, including how the printer should handle things like retraction, infill, and support structures.
While G-code is essential for ensuring accurate and precise printing, it is specific to the printer’s capabilities and settings, meaning different printers or machines might require slightly different G-code configurations.
How to Prepare Your Files for 3D Printing?
You can prepare your files for 3D printing through modeling, cleaning processes, exporting, and slicing the models for 3D printing.
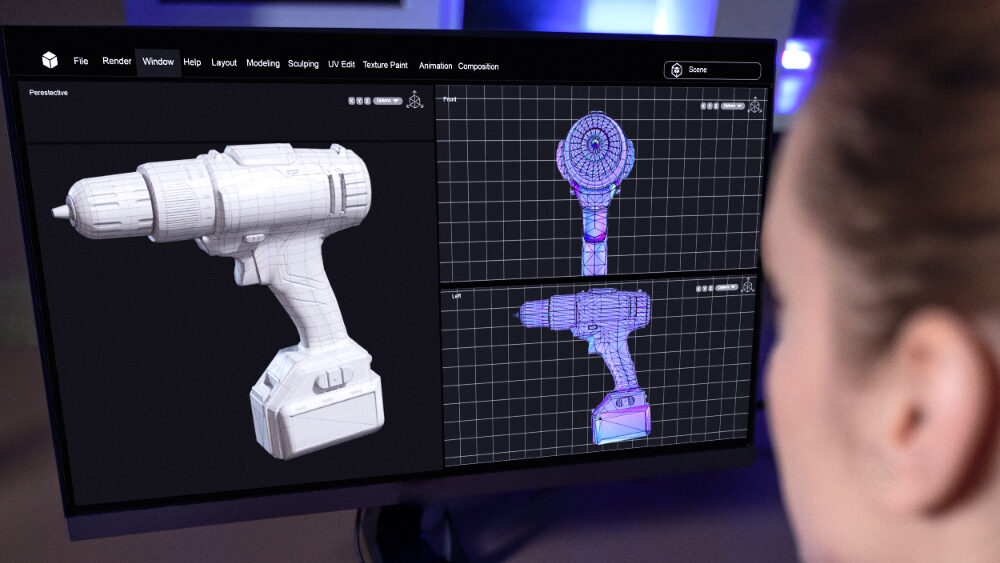
3D Modeling
3D Modeling is the process of creating a digital three-dimensional model using specialized software. It allows for the design of virtual objects by representing their shapes and structures in a three-dimensional space. This type of modeling is used in various fields, such as architecture, industrial design, video games, animation films, and of course, 3D printing.
In 3D modeling, the user can create complex shapes, adjust dimensions, apply textures, and even simulate physical behaviors. The created model can then be exported in different formats (such as STL, OBJ, or 3MF) to be used in applications like animation, visualization, or 3D printing.
Cleaning and Repairing the Model
Cleaning and repairing the model is an essential step in preparing a 3D file for printing. After the 3D model is created, it may contain errors or imperfections such as holes, inverted faces, or non-manifold edges that could cause printing issues. Cleaning and repairing the model ensures that it is “watertight,” meaning that it has no gaps or structural problems.
The process typically involves:
- Removing unnecessary elements: Deleting any unused parts or unnecessary details that might not be needed for the print.
- Fixing geometry errors: Using software tools like Meshmixer, Netfabb, or others to detect and automatically repair common issues such as non-manifold edges, overlapping vertices, or holes in the model.
- Ensuring proper orientation: Adjusting the model’s orientation so that it will print optimally, reducing the need for supports and ensuring proper adhesion to the print bed.
- Simplifying complex geometries: Reducing overly complex parts that could be difficult to print or may cause excessive print time.
Once the model is repaired and cleaned, it is ready to be exported and prepared for 3D printing.
Exporting the File in the Appropriate Format
Once the 3D model is created and cleaned, it must be exported in a format that is compatible with the slicing software and the 3D printer. Different 3D printers and software programs may require specific file formats, so it’s important to choose the right one.
Common file formats include:
- STL (Stereolithography): The most widely used format for 3D printing. It contains only the geometry (surface) of the model, represented as a mesh of triangles. It is compatible with most 3D printers and slicing software.
- OBJ: A format that can contain not only the geometry but also additional information such as textures and colors, making it suitable for more detailed prints.
- 3MF (3D Manufacturing Format): A newer format that is designed to address some limitations of STL files. It supports richer data, including color, materials, textures, and internal structures, making it ideal for multi-material and complex prints.
- AMF (Additive Manufacturing File): Similar to 3MF, AMF supports more advanced features, including material properties, colors, and textures. It is a less commonly used format but is becoming more supported by modern software and printers.
After selecting the appropriate format, the file is exported from the modeling software, and it’s ready to be imported into slicing software for further preparation (like slicing the model into layers and generating the G-code).
Slicing Software
Slicing is an essential step in the 3D printing process. It involves dividing the 3D model into thin horizontal layers that will be printed sequentially by the 3D printer. This operation is performed using slicing software that takes several parameters into account, such as the type of material, printing speed, necessary supports, and temperature settings, to generate a G-code file containing the printer’s instructions.
The slicing software analyzes the 3D model, calculates the path of the filament or material layer by layer, and adjusts the settings to ensure optimal printing. Depending on the defined parameters (layer thickness, infill density, supports), slicing can also affect the quality, strength, and print time of the object. This step allows the conversion of a digital model into precise instructions that the 3D printer can follow to construct the physical object.
Common Mistakes to Avoid with 3D Printing Files
Common Mistakes Can Arise from Complex Models, Large Files, or Support Issues.
Overly Complex 3D Models
Overly Complex 3D Models can cause several issues during the 3D printing process. These models may contain a high number of polygons, excessive details, or difficult geometries to print, leading to printing errors, extended production times, or poor-quality final objects. Additionally, a model that is too complex can overload the slicing software, making the generation of the G-code file slower and more prone to errors.
To address these problems, it is often necessary to simplify the model by reducing the number of polygons or removing unnecessary details, which lightens the workload for the printer. Some tools allow for simplifying the mesh while preserving the essential characteristics of the model. In some cases, it may be necessary to divide an overly complex model into smaller, easier-to-print parts, which can then be assembled after printing. These adjustments help optimize the manufacturing process and ensure a successful print.
Large File Sizes
Large File Sizes can present significant challenges in 3D printing. A file that is too large can overwhelm the slicing software, slow down the slicing process, and increase the time required to generate the G-code file. Additionally, some 3D printers may have storage or memory limitations, making the import and printing of large models problematic.
To solve this issue, it is often necessary to simplify the 3D model by reducing the number of polygons or optimizing the geometry, which helps reduce the file size. Some software tools offer features to compress files while maintaining sufficient quality for printing.
These techniques make it easier to print objects while avoiding the problems associated with overly large file sizes.
Lack of Supports or Internal Structure
The lack of supports or internal structure in a 3D model can cause problems during printing, especially for objects with complex shapes or overhanging parts. Without proper supports, these areas are at risk of collapsing during printing, leading to a failure of the final object. Additionally, the absence of internal structure, such as insufficient infill, can make the object too fragile, affecting its strength and durability.
To resolve this issue, it is essential to add supports and internal structures to the model, either manually or through the slicing software. Supports help hold overhanging parts in place during printing and are generally removed after manufacturing. Internal structures, like infill, fill the inside of the object to make it stronger and more stable, while also reducing the amount of material used. The density and type of infill can be adjusted according to the specific needs of the project. These adjustments ensure better print quality and the durability of the object once completed.
Dimensional Issues
Dimensional Issues in 3D Printing can occur when the printed model does not match the intended dimensions exactly, and this can be caused by several factors. Dimensional errors may result from poor printer calibration, material distortion during printing, or the limited precision of the 3D model itself. For example, an object may turn out slightly larger or smaller than expected, which can cause problems, especially for parts that need to fit together or align with other components.
To resolve these issues, it is essential to properly calibrate the 3D printer by adjusting parameters such as printing temperature, print speed, and axis alignment. Using well-designed and precise 3D files is also critical to avoid dimensional errors. Additionally, some slicing software allows for compensating dimensional issues by adjusting the scaling parameters of the model before printing. By applying these solutions, it is possible to improve the dimensional accuracy of printed objects and ensure they meet the project’s requirements.
What are the tools and software used to create and manipulate 3D printing files?
3D printing files can be manipulated using modeling, repair, or slicing software.
3D Modeling Software
3D modeling software are essential tools for creating digital objects in three dimensions, used in various fields such as 3D printing, animation, industrial design, and architecture. These programs allow for the design, modification, and visualization of 3D models before their fabrication or use in visual projects.
These software tools offer a wide range of features to create detailed models, perform simulations, and prepare files for 3D printing or other applications. Choosing the right software depends on the level of expertise, the specific needs of the project, and personal preferences.
3D Model Repair Software
3D model repair software are specialized tools that allow users to fix common errors found in 3D models before printing. These errors may include holes, unconnected edges, inverted faces, or incorrect geometric intersections. Such issues can compromise the quality of the print or even prevent the object from being printed correctly. 3D model repair software identifies and corrects these defects to make the model print-ready.
These tools are essential to ensure the quality and accuracy of 3D printed models by fixing defects that could affect the success of the print and the performance of the final object.
Slicing Software
The role of slicing software is to convert a 3D model (usually in STL or OBJ format) into instructions that the 3D printer can understand, typically in the form of G-code. This G-code contains detailed information about how the printer should lay down the material layer by layer to build the object. Slicing software also allows users to adjust parameters such as layer height, infill density, temperature, supports, and print speed.
Such software transforms 3D models into printable instructions tailored to the 3D printer, optimizing material usage and print quality while offering customization and adjustments based on the specific needs of the project.
What are the best practices for successful 3D printing?
To achieve a successful 3D print, you need to conduct thorough testing and optimizations.
Tests and Validations to Perform for Successful 3D Printing
Tests and validations are crucial steps in the 3D printing process, ensuring that the printed model meets expectations in terms of quality, functionality, and accuracy. These steps help identify errors or defects before producing batches of objects, thus guaranteeing an optimal final result.
Printer Calibration Test
Before any print, it is essential to verify that the 3D printer is properly calibrated. This includes checking the bed level, the extruder and heated bed temperatures, as well as the print speed. Incorrect calibration can lead to dimensional errors or adhesion defects.
Dimensional Accuracy Tests
When printing a model for the first time, it is important to measure the dimensions of the printed object to ensure they match the specifications of the 3D model. Dimensional errors can occur due to improper slicing settings, material deformation during printing, or issues with the printer itself.
Tests for Strength and Durability
For certain objects, especially those intended for functional applications, it is necessary to test their strength. This can include compression, tension, or torsion tests to verify the robustness of the model based on the materials used and printing parameters (such as infill).
Adhesion and Finishing Tests
It is important to verify that the printed object adheres properly to the build plate throughout the printing process. If the model experiences issues with detachment or deformation, adjustments in parameters such as temperature or print speed may be necessary.
Assembly Tests
For printed parts that need to be assembled or interact with other components, it is crucial to check their fit. These tests ensure that the pieces fit together correctly, without excessive play or stress.
Validation of Supports and Internal Structures
The supports generated by the slicing software must be checked to ensure they are sufficient to support overhanging parts and can be easily removed after printing. Additionally, the internal structure (infill) should be validated to ensure the object is strong enough while minimizing material usage.
Finishing and Appearance Tests
Depending on the objective, it may be necessary to check the aesthetic appearance of the printed object, ensuring there are no marks or surface defects. This includes tests to verify the quality of finishes, the accuracy of details, and the uniformity of colors.
These tests help validate the printed model and identify necessary adjustments in the printing settings before proceeding with mass production.
Optimization of the G-code
Optimizing the G-code involves adjusting the instructions sent to the 3D printer to ensure better efficiency, quality, and performance. This can include fine-tuning parameters such as print speed, layer height, infill density, and support structures. Proper optimization helps reduce printing time, minimize material usage, and enhance the final print quality.
These optimizations may also address issues like improving the part’s strength, reducing warping, or enhancing surface finish, ensuring that the printed object meets the desired specifications.
Reduction of Unnecessary Movements
Reducing unnecessary movements in the G-code is a key optimization strategy. This involves minimizing the travel time of the print head when not printing, which helps to speed up the printing process and reduce the risk of issues like stringing or oozing. By carefully adjusting the paths and commands in the G-code, the printer can avoid excessive backtracking and idle movements, leading to more efficient use of time and material.
Such adjustments contribute to smoother prints, lower energy consumption, and a cleaner final result.
Optimization of Print Speed
Optimizing print speed involves adjusting the G-code to balance speed with print quality. Increasing the print speed can reduce overall printing time, but it may affect the surface finish, layer adhesion, and accuracy of finer details.
By fine-tuning settings such as print speed, retraction speed, and acceleration, the process can be optimized to achieve faster prints without compromising too much on quality. Depending on the type of object, some parts may allow for higher speeds without affecting the final result, while others may require slower settings to ensure precision and smoothness. This optimization helps increase efficiency while maintaining the desired print quality.
Reduction of Infill
Reducing the infill density in 3D printing helps to save material and decrease print time, especially for non-structural or aesthetic parts where strength is not a major concern. Lowering the infill percentage reduces the amount of plastic used inside the model, which can result in lighter objects without sacrificing too much durability.
However, it’s important to find a balance. Too little infill may compromise the part’s strength, while too much can lead to longer print times and unnecessary material usage. By optimizing infill settings, you can achieve a good balance between strength, material efficiency, and print time.
Layer Optimization
Optimizing the layers in 3D printing refers to adjusting the layer height, layer width, and layer number to achieve the best balance between print quality, speed, and material usage.
- Layer Height: A smaller layer height improves the print’s surface finish and accuracy but increases print time. A larger layer height speeds up the process but may reduce the level of detail.
- Layer Width: Optimizing the width of each extruded line ensures that the layers bond properly, improving strength and print quality.
- Number of Layers: Reducing the number of outer layers or the number of solid layers can reduce material usage and printing time without significantly affecting the structural integrity for certain applications.
The goal of layer optimization is to maintain the desired quality and strength while minimizing time and material consumption.
Improvement of Supports
Improving support structures in 3D printing is essential for ensuring that overhanging or intricate parts of a print are adequately supported during the printing process. Well-optimized supports make it easier to remove them after printing and help prevent issues like sagging or warping. Here are key ways to improve supports:
- Support Density: Reducing support density while maintaining sufficient coverage can minimize material usage and make the supports easier to remove.
- Support Style: Switching from traditional support structures to more advanced ones, such as tree supports, can save material, reduce print time, and make the supports easier to remove.
- Support Placement: Adjusting the placement of supports to minimize contact with the model’s visible surfaces can improve the final finish and reduce post-processing work.
- Overhang Angles: Fine-tuning the angle at which supports are generated can ensure better performance. Typically, supports are needed for angles greater than 45°, but fine adjustments can optimize support usage.
- Interface Layers: Adding a layer of separation between the support and the object can make support removal easier and improve the surface quality of the part.
These optimizations allow for better efficiency, cleaner prints, and easier post-processing while ensuring the model’s structural integrity during printing.
Temperature Management
Effective temperature management is crucial in 3D printing to ensure optimal layer bonding, reduce warping, and achieve the best print quality. It involves adjusting both the print bed temperature and the extruder (hotend) temperature.
Anticipation of Loop Movements
Anticipating loop movements in 3D printing involves optimizing the G-code to minimize unnecessary travel and retraction movements, ensuring a smoother and more efficient print process. This optimization helps to reduce print time, material wastage, and the risk of stringing or oozing.
Extrusion Speed and Acceleration
The extrusion speed and acceleration settings are crucial parameters that directly impact the print quality, material flow, and overall speed of a 3D print. Proper optimization of these settings ensures better precision, reduced print defects, and faster print times without sacrificing the final quality.
3D Print Monitoring
3D printing monitoring is a crucial step to ensure that the printing process runs smoothly, without errors or interruptions. It helps identify and resolve issues that may arise during printing, such as quality defects, hardware errors, or printer failures. Monitoring also allows for process optimization, real-time adjustments to parameters, and ensures reliable and efficient production. Here are some key aspects of 3D printing monitoring:
Real-time monitoring
Many software programs and devices allow for real-time monitoring of 3D printing, through a camera or sensors integrated into the printer. This enables users to visualize the print’s status, check the model’s adhesion to the build plate, and ensure there are no warping or defects during the fabrication process. Some systems even allow for receiving alerts in case of an issue.
Temperature control
The temperature of the extruder and the heated bed must be monitored throughout the printing process. Real-time monitoring ensures that these parameters stay within the optimal range, thus guaranteeing good material adhesion and preventing defects caused by incorrect temperatures.
Filament monitoring
Filament monitoring, including its level and flow rate, is essential to avoid interruptions during printing. Sensors can alert the user when the filament is running low or if there is an issue with extrusion (clogging, lack of material, etc.).
Movement and extrusion control
Monitoring the movement of the print head and filament extrusion ensures that the printer follows the G-code instructions accurately and that the material is deposited evenly, without under-extrusion or over-extrusion, which can affect print quality.
Recording print data
Monitoring can also include recording print parameters (temperature, speed, layer height, etc.) as well as data related to the progress of the print. This information is useful for diagnosing issues and improving future prints by adjusting the parameters.
Automation and remote control
Some systems allow the printer to be controlled remotely via a Wi-Fi or Ethernet connection. Through mobile apps or web interfaces, the user can monitor, control, and even adjust the print remotely, which is especially useful for long or complex prints.
Print logs and reports
Many software programs offer the ability to generate detailed reports on the printing process, including printer performance, adjustments made, and errors detected. These reports are useful for post-print analysis and improving printer performance.
3D printing monitoring not only ensures better print quality but also allows for proactive issue management. It enables users to intervene quickly when necessary, minimizing the risk of failure and maximizing the efficiency and productivity of the printing process.
What is the future of 3D printing files?
Many innovations are emerging with the launch of new printing files, improvements to existing files, and the integration of artificial intelligence into 3D printing processes.
Emerging file formats
Emerging file formats for 3D printing aim to enhance precision, compatibility, and the richness of information conveyed to printers. Among them, the 3MF (3D Manufacturing Format) stands out as a modern alternative to the traditional STL format. Unlike STL, which only contains basic geometric information, 3MF can include additional data such as colors, textures, materials, and assembly information, making it easier to handle complex workflows and reducing the risk of errors.
Other formats like AMF (Additive Manufacturing File Format) and OBJ are also gaining relevance, particularly due to their ability to manage multi-material models. These emerging formats address the growing demands of industries using 3D printing, especially in fields like healthcare, aerospace, and custom manufacturing.
Improvement of slicers and modeling tools
The improvement of slicers and 3D modeling tools has significantly optimized the 3D printing process by offering advanced features to create more complex models and achieve higher-quality prints. Slicers have evolved to handle multi-component materials, optimize print paths, improve support management, and provide 3D previews of prints, thereby reducing errors and production time.
Meanwhile, modeling tools have integrated material simulation capabilities, more precise parametric modeling, and enhanced user interfaces, making it easier to design objects with complex internal structures while optimizing material usage. These improvements enable greater customization of prints, better performance of printed parts, and more efficient resource management, transforming 3D printing into a faster, more cost-effective, and flexible process.
The integration of artificial intelligence
The integration of artificial intelligence (AI) in 3D printing is revolutionizing how models are designed, sliced, and printed by bringing advanced automation and optimization. AI allows for the analysis of complex data and learning from manufacturing processes to improve print quality in real-time. For example, AI-powered slicers can automatically adjust print parameters (such as speed, temperature, or infill density) based on the model’s characteristics, reducing human errors and improving efficiency.
AI can also predict potential failures, detect anomalies during printing, and adjust print paths to avoid defects. Additionally, 3D modeling tools that integrate AI algorithms can generate optimized designs for specific performances, such as strength or lightweight properties, while reducing material waste. The integration of AI thus makes 3D printing smarter, faster, more precise, and better suited to the complex needs of users.
Conclusion: 3D Printing Files
The future of 3D printing files is marked by continuous innovation, enhancing precision, compatibility, and customization. Emerging file formats like 3MF, AMF, and OBJ offer more advanced capabilities than the traditional STL format, enabling richer and more accurate information to be transmitted to printers. The improvement of slicers and modeling tools has streamlined the printing process, allowing for more complex designs and better print quality. The integration of artificial intelligence adds a layer of automation and optimization, further enhancing efficiency, reducing errors, and allowing for real-time adjustments during printing.
These developments collectively ensure that 3D printing can meet the growing demands of industries such as healthcare, aerospace, and custom manufacturing, offering faster, more cost-effective, and precise solutions. As these technologies continue to evolve, the role of 3D printing in manufacturing and design will become even more transformative, opening up new possibilities for personalization, resource management, and innovation across various fields.
Picture by Freepik.
The articles published on Imprimy.com are for informational purposes only. They are intended to provide general advice and information related to 3D printing. Imprimy.com cannot be held responsible for the results obtained or the consequences arising from the application of the shared information. We recommend always checking the specific instructions for your hardware and materials before use.
Our other contents about 3D printing technology:
SLA 3D Printing
Are you wondering about SLA 3D printing and its specific features? At Imprimy.com, we’re here…

SLS 3D printing
Do you want to learn more about SLS 3D printing and its specificities? At Imprimy,…
3D printing with powder
Are you wondering about 3D powder printing and how it works? At Imprimy.com, we are…